SPF, DKIM, and DMARC are techniques intended to decrease spam for recipients and protect senders from spoofing. The technical standards allow email vendors correctly identify the sender and fairly decide about accepting the email, marking it as spam, rejecting it, or blacklisting it.
A combination of DMARC, DKIM, and SPF authentication is like a driving license. You can drive a car without the document, while you are at risk of a fine. The same with the protocols. You can send emails skipping the email authentication process, though you are always at risk of getting into spam or being spoofed.
Correct authentication of your sender domain is one of the ways to land email into recipients’ primary inbox. It won’t solve all your email deliverability issues.
You are lucky if you know about DMARC, SPF, and DKIM authentication in advance. At the same time, it is curable if you already have deliverability issues or are being blacklisted. Go through the article to configure the email standards rightly and fully benefit from it.
Tools:
-
your DNS account, where you manage your domain, e.g. GoDaddy, Namecheap, Cloudflare
-
all email software you use to send emails, e.g. Mailerlite, Active Campaign, Woodpecker
Time: the setting process will take around 30 minutes + you will need to wait until your records come into effect. Most providers mention that it may take up to 2 days. It is often faster, though.
Risks of skipping DMARC, DKIM, and SPF email authentication
-
Spoofing is when someone illegitimately sends emails on your behalf (from your email address). Usually, to obtain sensitive data of the recipients.
-
Low deliverability rate. If you don’t have the SPF, DKIM, and DMARC record in your DNS account, you leave it to the recipient email servers to decide what to do with your emails. They may be delivered to the recipient's inbox (perfect outcome), go to the spam folder, bounce, be discarded, or even blacklisted.
-
Damaged domain reputation influences your future deliverability rate, i.e., how email providers will treat your messages, and also open rate, i.e. how recipients will treat your future emails.
-
Altered email content. One of the protocols, DKIM email authentication, informs the recipient emailing software whether the message was changed during transit. You can configure DMARC in the way so the email will be declined, and your recipients won’t see the incorrect message.
Important: If you already have deliverability problems:
-
Configure email standards properly
-
Use warm-up tools to improve reputation
-
Temporarily stop all your email campaigns
What is the sender policy framework, and how does it work?
SPF (sender policy framework) implies an email authentication method that specifies what email tools (their servers) are authorized to send your email. It protects a sender’s domain from spoofing and a recipient’s — from spam. You can see SPF as a record in your DNS account.
SPF works this way:
-
You create an SPF record authorizing certain email software servers (e.g., your own server, Postmark, Active Campaign, Woodpecker) to transfer your emails
-
Add the record to your DNS account
-
Start sending emails
-
Receiving email server checks your email sender policy framework record
-
If everything is OK, your email is landed in the recipient's inbox
-
If the sending server IP address isn’t in the SPF record, based on your settings, your email will be discarded or go to a spam folder.


How to set up SPF records
- Step 1. Make a list of email software you use
- Step 2. Find email providers' domains to use in your SPF record
- Step 3. Create an SPF record
- Step 4. Add the record to your DNS account
- Step 5. Save all changes and wait around 48 hours until it takes effect
Step 1. Make a list of email software you use
Companies often use more than one system to deliver their emails to recipients. For instance, cold emails, marketing newsletters, and transactional emails. You will add each of them to your SPF (sender policy framework) record.
Step 2. Find email vendors' domains to use in your SPF record
It is important to note that the information you will add to the SPF record may vary with different email providers.
The domain you will add in the SPF authentication record often doesn’t match their main domain. You can’t just paste «google.com» when sending emails via the Google app.
To find the information, google or go through the email software website to find related help documentation. For example, look up: «mailchimp SPF record setup».
Step 3. Create an SPF record
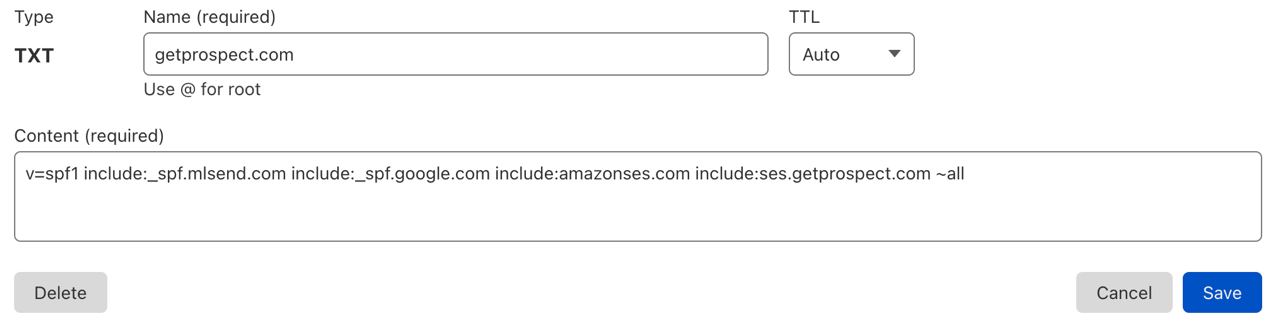
SPF record starts with «v=spf1». It specifies the record as SPF.
Then you add domain names of sending tools and sometimes IP addresses. Add all necessary domains in a row without any punctuation: «include:... include…». Add IPs in a row this way: «ip:... ip:...».
End the SPF authentication record with «-all» or «~all». The former is a hard fail — receiving email servers will accept emails from ONLY these servers, and the latter is a soft fail — receiving email servers decide what to do with the software. Typically it goes to spam.
Step 4. Add the record to your DNS account
Each DNS has its own place where you will add an SPF record. You can check their help center materials to find the manual on the process. Typically you’ll locate it in Advanced Settings, DNS Management, or Name Server Management section. Here are links to guides from the most popular domain hosting companies:
Important! You can have only one SPF record per domain. Don’t create one more record if you change it or start using one more email tool. It is a common reason for an SPF authentication be failed.
Here is how the record will look in your DNS account:
What is DomainKeys identified mail (DKIM)
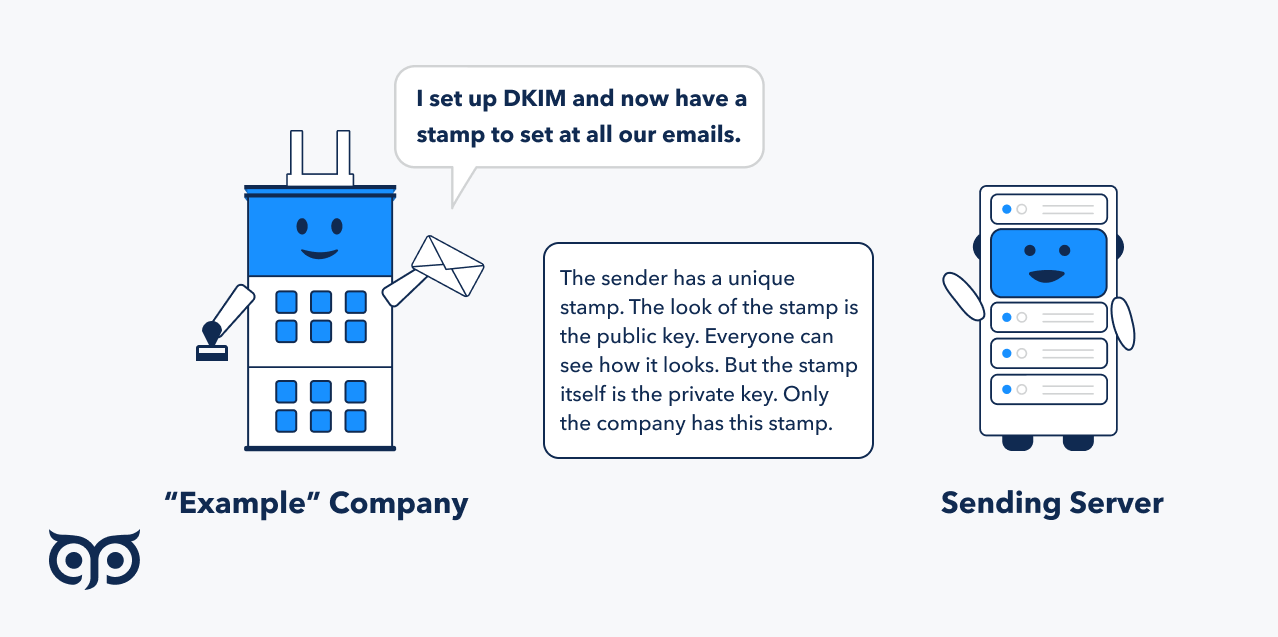
DKIM protocol is another email authentication method that checks whether the email body or «From» section was altered on the way to a recipient. It also protects you from spoofing and getting into spam folders and recipients — from unsolicited emails. DKIM uses an encryption algorithm to sign every email sent from your domain so receiving email provider can validate a DKIM record and authorize you.
The encryption algorithm uses private and public keys. A public key is what you will add to the DKIM record, and a private key is automatically assigned by your email provider and put in the header of your email.
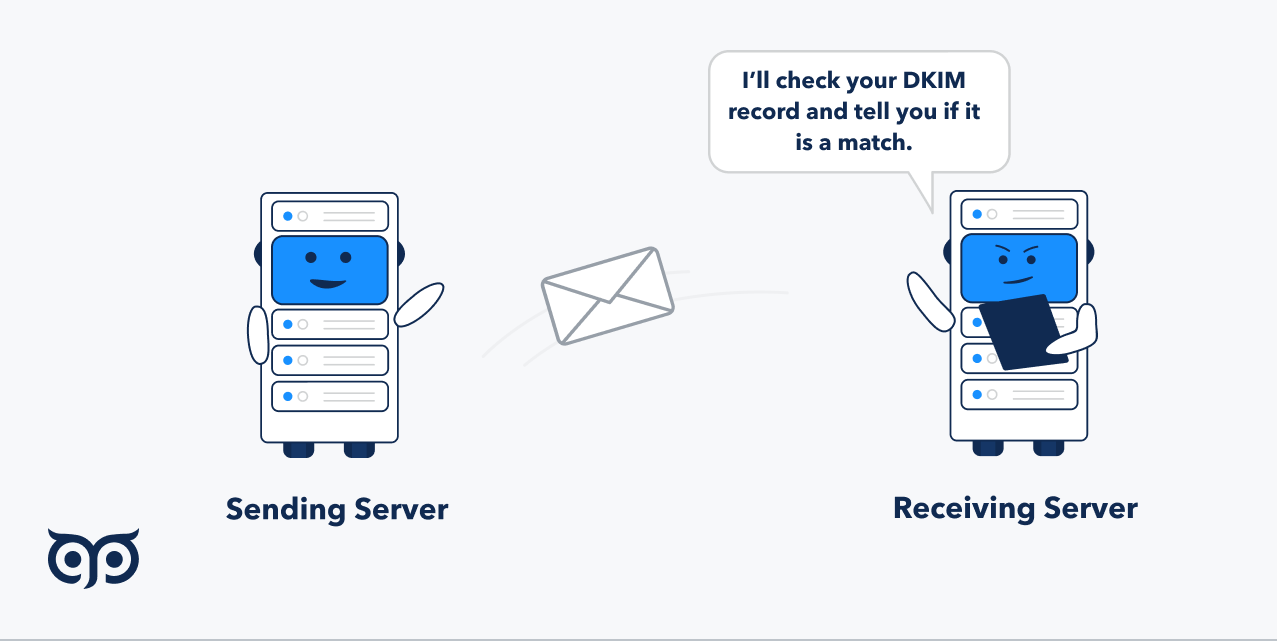
Once you have DKIM record, all emails from your domain will be signed by the private key. Using the public key, receiving email vendors can check the email digital signature (private key) and understand the content wasn’t changed in transit. If the private key doesn’t match the public key, the result is failed DKIM authentication.
How to setup DomainKeys identified mail
- Step 1. Generate an email DKIM record in each of your email software
- Step 2. Add the record to your DNS account
- Step 3. Go to your email providers and start authentification
Step 1. Generate an email DKIM record in each of your email software
If you are using Google for sending emails, follow this path: Google Admin Console → Apps → Google Workspace → Gmail → Authenticate email.
Click «Generate new record» — the 3 lines of random characters will automatically change.
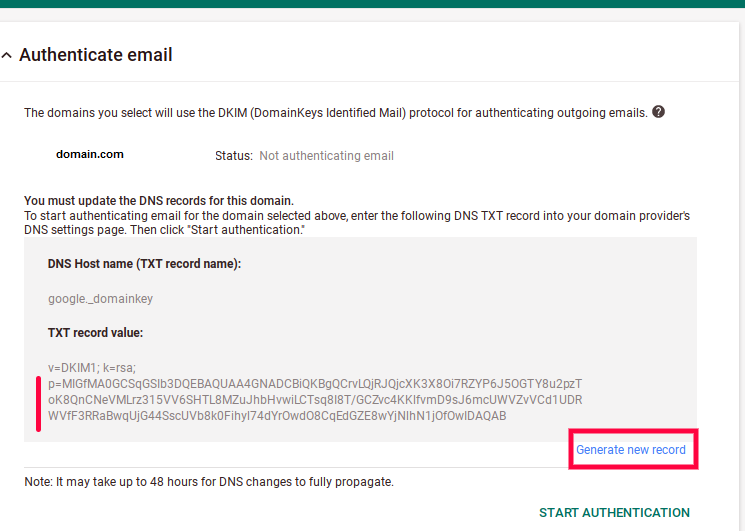
The generated line of numbers, letters, and other characters is a public key.
The «DNS Host name» and «TXT record value» from the screenshot above are what you will copy and paste into your DNS manager (the next step).
Here are instructions from popular email vendors:
Zoho
Microsoft
If you are using something else — look through their help docs or contact their support team.
Step 2. Add the record to your DNS account
Head over to your DNS account. Copy the hostname from the email vendor in the corresponding field and copy «TXT record value» to the «Value» section to create an email DKIM record.
Follow the links we provided in Step 4 of SPF setup instructions or look up help docs of your domain manager.
Step 3. Go to your email vendors and start authentification
After adding the DKIM record, head back to your email vendor and click «Start authentication».
DKIM email authentication takes effect once you see the Status changed to «Authenticating email».

For each email service that sends emails on behalf of your domain, you will create separate DKIM records. For example, you use Gmail and Postmark to send your emails, so you require at least one DKIM record per email software. The records differentiate by selector — simply put, the name of the key.
Email providers usually provide selectors. In Google's case, the selector is the DNS hostname.
Selectors communicate to the receiving email server what to check of these DKIM records.
What is DMARC authentication
Domain-based Message Authentication, Reporting & Conformance (DMARC) is one more authentication method that allows companies to prescribe how emails should be treated by mailing software if they fail SPF or DKIM authentication. The protocol provides you with an SPF and DKIM performance report and data on who sends emails on behalf of your domain.
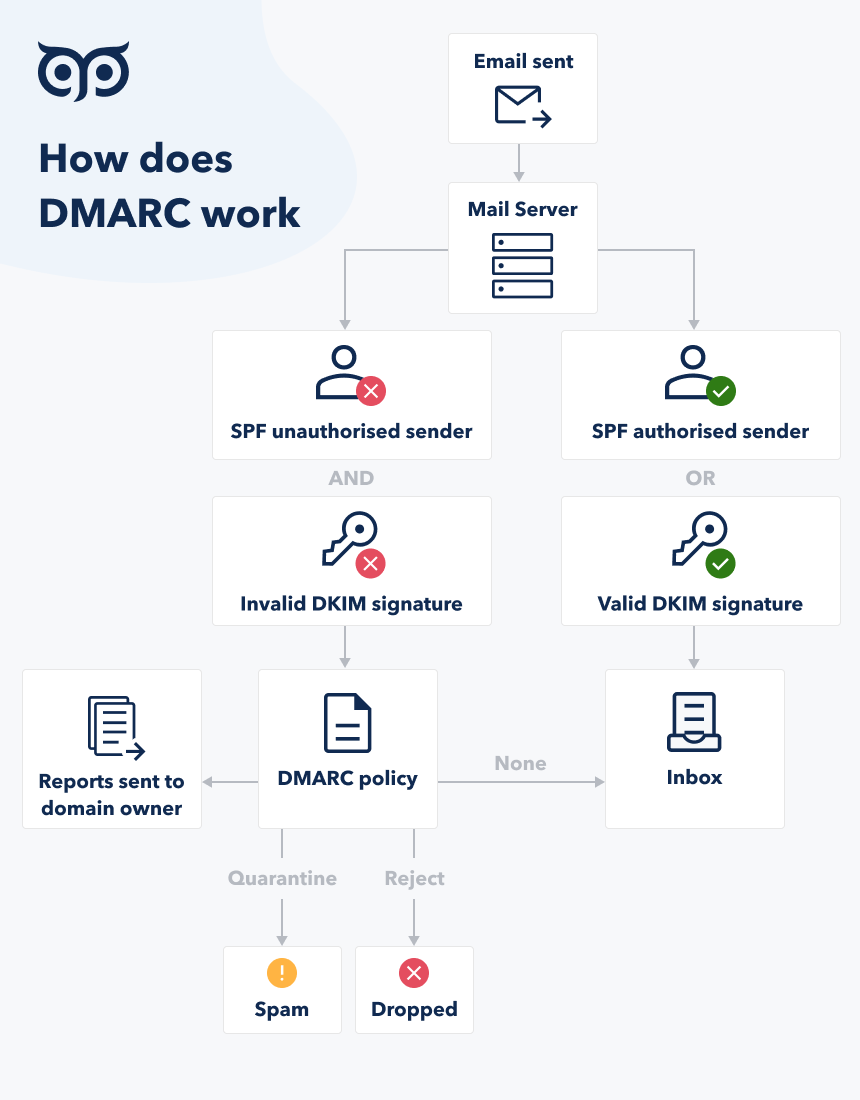
DMARC gives you three options of what to do with your failed DKIM authentication and SPF authentication email:
-
None. Receiving server decides how to treat your email.
-
Quarantine. Receiving server should direct the email to the spam folder.
-
Reject. In these cases, emails will be rejected by receiving email server, and you will have a notification about failed delivery.
The raw Domain-based Message Authentication, Reporting & Conformance (DMARC) report is an XML file, so it looks like a lot of code difficult to understand for a non tech-savvy person. Email vendors often furnish you with user-friendly weekly reports. The example from Postmark:
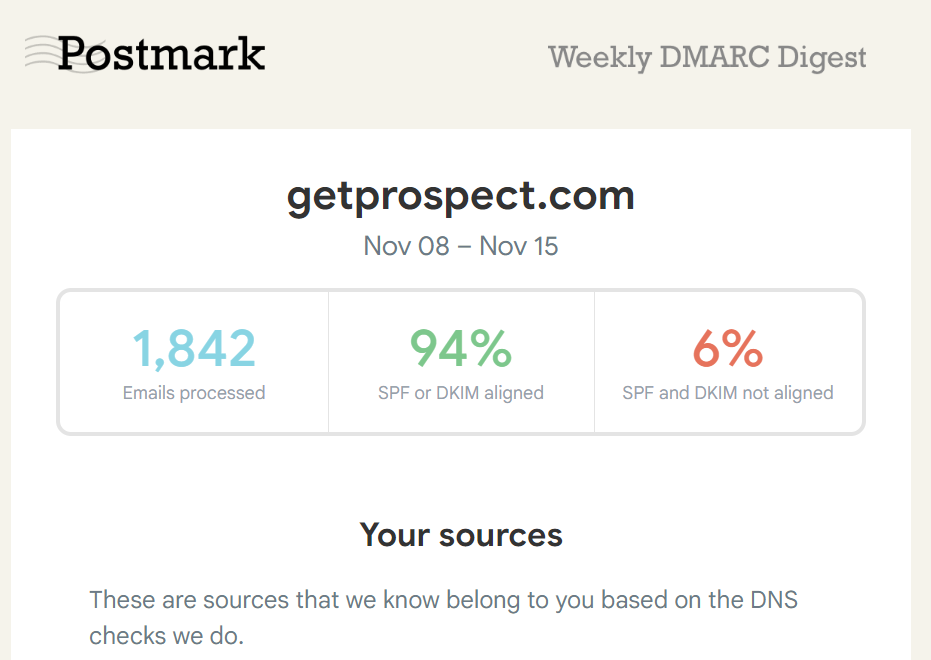
If your email provider doesn’t furnish you with visualized DMARC reports, you can get the same Postmark reports you see above with their tool.
Review the reports regularly if you send mass emails or manage several email campaigns. In other cases, check it once if you notice, let's say, an increase in your bounces in your email analytics — to rule out the authentication issues. Regularly monitoring user activity and engagement metrics through DMARC reports can also help identify potential issues with email deliverability and authentication.
How to set up your own DMARC
- Step 1. Use the DMARC record generator
- Step 2. Add DMARC record to your DNS account
Important: DMARC can’t exist without SPF and DKIM settings. So set up the first 2 protocols before setting up DMARC.
Step 1. Generate DMARC record
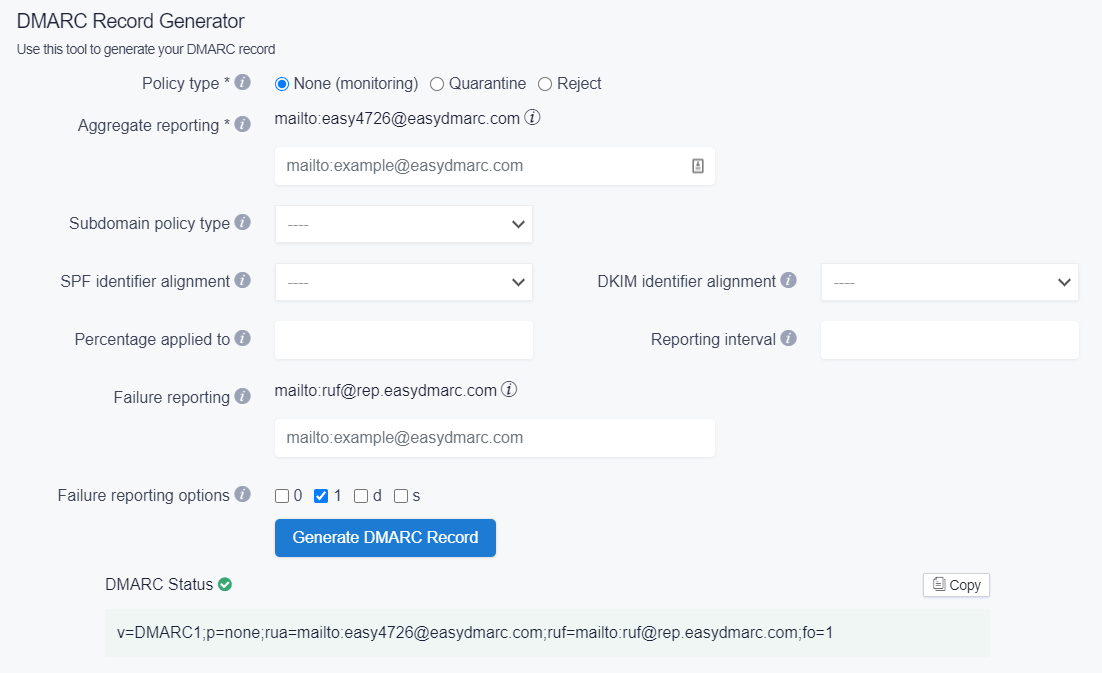
DMARC record has several values, so it might be easier to leverage DMARC generators. MXtoolbox and Easy DMARC are some of them. Here is the example with the latter:
-
Choose your policy type. Typically «Reject» option is considered the most effective, though in this case, you should be 100% sure in your correct settings (SPF and DKIM email authentication). Otherwise, your legitimate emails will be rejected.
-
Enter the email address you want to get reports to in «Aggregate reporting». We recommend having a separate mailbox or group for the emails. Depending on how many emails you send, you may have dozens and hundreds of daily reports.
-
DKIM and SPF email authentication identifier alignment are relaxed by default. It is also a recommended option. In strict mode, your «from:» domain and «Return-Path» domain in the email header must align.
-
Choose the percentage of emails the DMARC will apply to. The default is 100%.
-
In the «Reporting interval» section, choose how often you want to receive the DMARC reports in seconds. The default is 86400 sec = 1 day.
-
Enter the email address for failure reports.
-
Choose failure reporting options — what information you'll get about SPF and DKIM email authentication success. The optimal type is 1 — your reports will notify you about any outcome from your authentication methods other than positive. You can read about other report types here.
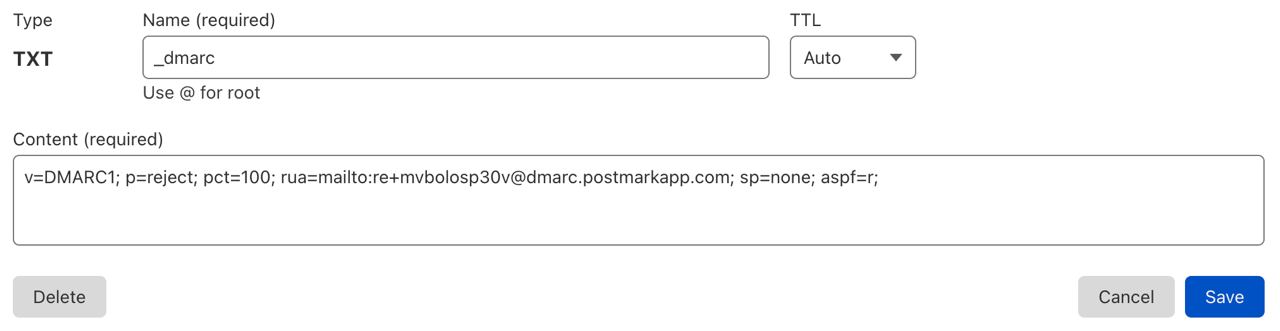
Step 2. Add DMARC record to your DNS account
-
In «hostname» field, enter _dmarc.
-
Paste the record you generated in the first step in the «Value» section.
-
Save the record.
-
Your domain is ready to send emails.
Here is our example of the DMARC record in DNS.
Сheck if the DMARC, DKIM, and SPF authentication work properly
Even if you follow all the instructions here, something might go wrong. It is a good idea to know it before you send hundreds of emails :) There are several ways to confirm everything is set up correctly.
1. Send an email from your domain and check its header. Here is how to find it in Gmail: open the message and click the three dots.
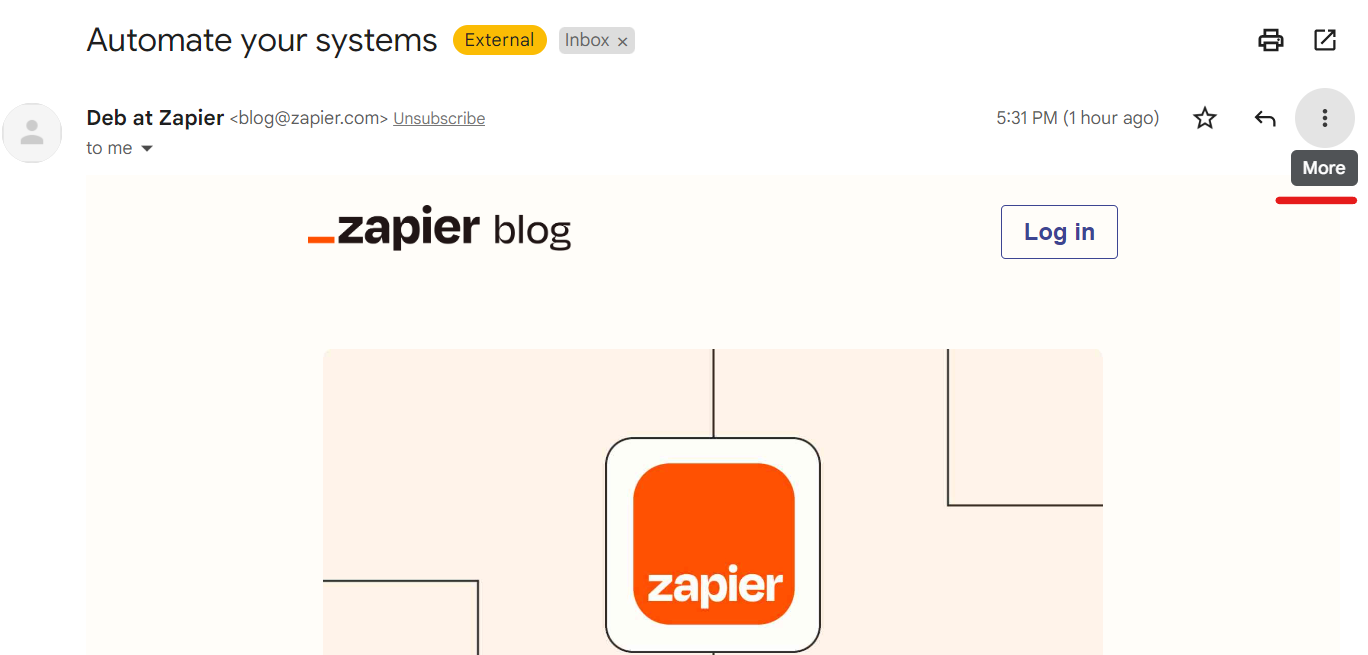
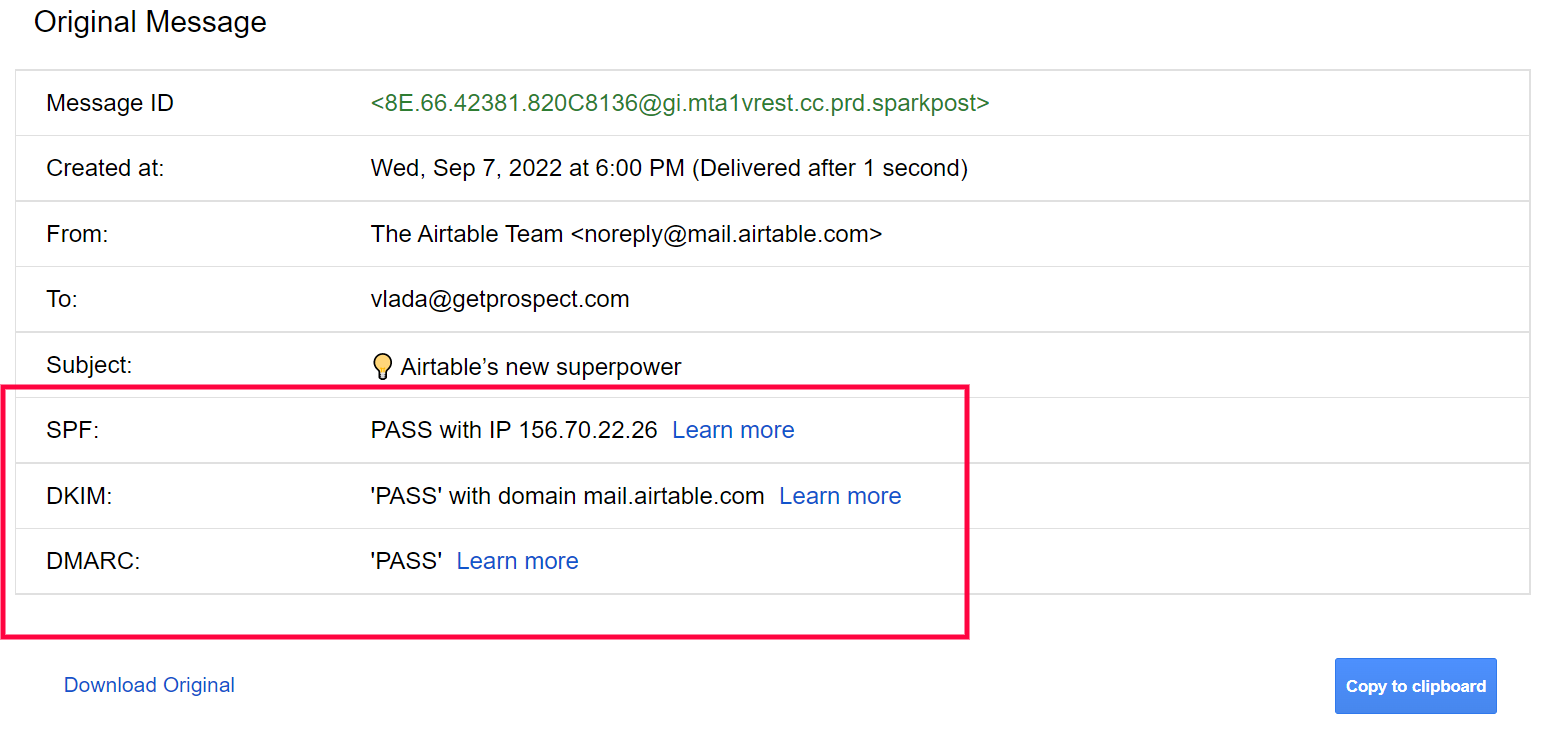
From the options, you will see, choose «Show original». Here you will see the statuses of your authentication methods: PASS is the sign that your email went through authentication successfully and your settings are correct.
2. You can use special tools to check your setup. MxToolbox has DMARC , SPF, and DKIM checkers.
Monitoring & updates
Typically, you just need to watch general email analytics to uncover if anything goes wrong with your email authentication. Keep an eye on bounce rate and open rate. If you spot a spike in bounces or opens drop below average figures, among other things, go through your DMARC analytics and leverage the DMARC, DKIM, and SPF record syntax checker from the previous section.
If everything goes smoothly with the email authentication, you typically need updates only if you start using a new email vendor/server to send emails from your domain.
SPF vs DKIM: why does every protocol matter
SPF is the tool to establish what email providers can deliver emails on behalf of your domain. DKIM is the digital signature, so receiving email servers can check if the message is changed or forged.
Actually, the DKIM and SPF email authentication standards do different jobs with the common goal of protecting you from a spam folder and spoofing. So it isn’t a matter of choice. The standard setup is relatively easy, so it doesn’t worth the risk of spam and domain reputation.
Some mainstream mailing tools will send unauthenticated emails to spam, and some — mark it as suspicious. So if emailing is a considerable part of your business communication, you should definitely think about having email authentication for your domain.
Authentication settings are correct, and deliverability is still low
Again, DMARC, SPF, and DKIM email authentication won’t solve all your deliverability problems. Deliverability may be influenced by:
-
Some of your emails are invalid. Verify your emails right before the campaign with the email verifier online.
-
A new email account isn’t warmed up.
-
Spam words or blacklisted links in your email body.
-
The wrong software. Some are better for newsletters, and some — are for cold emails.
-
The absence of an unsubscribe option and many spam reports as a result.
Summary
-
If your email campaigns are an influential part of your business, set up email authentication
-
Risks of launching email campaigns without DMARC, SPF, and DKIM email authentication protocols: low deliverability rate, damaged domain reputation, spoofing, etc.
-
It takes around 30 min to set up the authentication methods + 2 days to wait until they take effect. From tools, you require your domain manager and all email vendors you plan to use
-
Don’t forget to test your authentication before launching a campaign. There is DMARC, SPF, and DKIM tester to make it faster
-
Track your general analytics for unusual negative changes in metrics. If this is the case, check your authentication settings again
-
Update the records once you start using a new email provider
Important! Recheck email validity right before the email campaign
The validity status may change if you found the emails a week or a month ago. Make sure they wont ounce
Verify all emails at once
